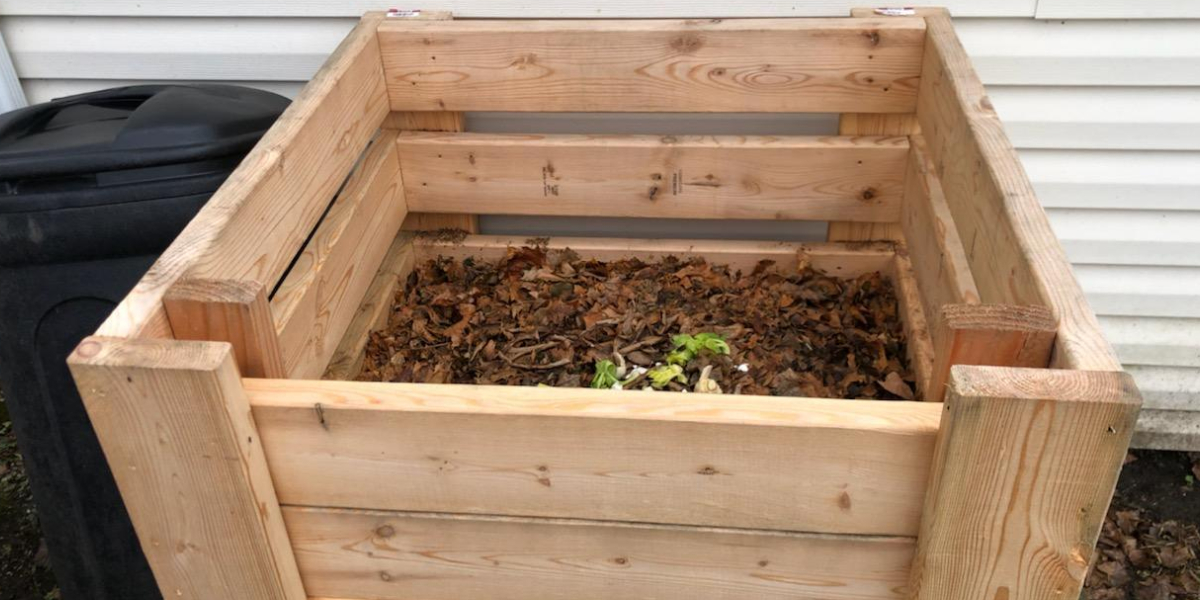
Step-by-Step Guide to Building a Large Compost Bin
Transforming your kitchen scraps and yard waste into nutrient-rich compost is a rewarding and environmentally friendly endeavor. Building a large compost bin provides ample space to accommodate your composting needs, ensuring a steady supply of valuable fertilizer for your garden. This comprehensive guide will walk you through the process of constructing a sturdy and functional compost bin, empowering you to embark on your composting journey.
Choosing the Right Location
Before embarking on the construction process, selecting the optimal location for your compost bin is crucial. Consider the following factors:
Sunlight and Shade
Composting thrives in a balanced environment. While direct sunlight can be beneficial, excessive heat can cause the compost to dry out. Aim for a location that receives partial shade, such as under a tree or near a building.
Accessibility
Choose a spot that is easily accessible for adding materials, turning the compost, and removing finished compost. Consider the proximity to your kitchen, garden, or frequently used pathways.
Drainage
Proper drainage is essential for preventing the compost from becoming waterlogged. Select a location with well-drained soil or create a slight slope to facilitate water runoff.
Materials and Tools
To build a large compost bin, you will need the following materials and tools:
Materials
- Wood: Select durable, rot-resistant wood such as cedar, redwood, or pressure-treated lumber. Avoid using treated lumber directly in contact with food scraps.
- Screws or Nails: Use stainless steel screws or galvanized nails for long-lasting durability.
- Hardware Cloth: Choose 1/2-inch mesh hardware cloth to keep out pests while allowing air circulation.
- Staple Gun or Hammer and Staples: For securing the hardware cloth.
- Optional: Metal hinges, a latch, or a door for easier access to the compost.
Tools
- Saw: For cutting the wood to size.
- Drill: For pre-drilling holes for screws.
- Tape Measure: For accurate measurements.
- Level: To ensure that the bin is level.
- Safety Glasses and Gloves: For protection during construction.
Building the Compost Bin
Now, let's build your compost bin!
Step 1: Determine the Dimensions
Start by deciding on the dimensions of your compost bin. A standard size is approximately 4 feet by 4 feet by 4 feet, providing ample space for composting. Adjust the dimensions based on your needs and available space.
Step 2: Cut the Wood
Using a saw, cut the wood according to your chosen dimensions. You will need four side panels, two bottom panels, and two top panels.
Step 3: Assemble the Frame
Lay out the side panels and bottom panels on a flat surface. Use screws or nails to secure the bottom panels to the side panels, creating the base of the bin. Repeat this process for the top panels to create the lid.
Step 4: Attach the Hardware Cloth
Cut the hardware cloth to fit the inside of the bin. Using a staple gun or hammer and staples, securely attach the hardware cloth to the inside of the bin, ensuring that it covers all the sides and the bottom. This will prevent pests from accessing the compost while allowing air circulation.
Step 5: Attach the Lid
Place the lid on top of the bin and use screws or nails to attach it to the side panels. If desired, you can incorporate hinges and a latch for easier access to the compost.
Step 6: Add Compost Materials
Once your compost bin is complete, you can start adding compost materials. Layer brown materials such as leaves, shredded paper, and cardboard with green materials such as kitchen scraps, grass clippings, and manure. Maintain a balance of brown to green materials to ensure proper decomposition.
Composting Tips
Follow these tips to enhance your composting process:
Turn the Compost Regularly
Regularly turning the compost will ensure adequate air circulation and promote even decomposition. Aim to turn the compost at least once a week.
Maintain Moisture Levels
Compost needs to be moist, but not waterlogged. Add water as needed, aiming for a dampness similar to a wrung-out sponge.
Monitor Temperature
The optimal temperature for composting is between 130°F and 160°F. Use a compost thermometer to monitor the temperature and adjust the materials or moisture levels as needed.
Avoid Certain Materials
Not all materials are suitable for composting. Avoid adding meat, bones, dairy products, oil, and grease, as they can attract pests and produce unpleasant odors.
Enjoy the Benefits of Composting
Composting offers numerous benefits, including:
- Reducing Waste: Composting diverts organic waste from landfills, promoting sustainability.
- Enriching Soil: Compost provides valuable nutrients and improves soil structure, benefiting your garden.
- Promoting Plant Growth: Compost encourages healthy plant growth and increases yields.
- Saving Money: Compost eliminates the need to purchase expensive commercial fertilizers.
- Environmental Sustainability: Composting contributes to a healthier planet by reducing greenhouse gas emissions and conserving resources.
Building a large compost bin is an investment in your garden and the environment. By following these steps, you can create a functional and aesthetically pleasing compost bin that will provide you with a continuous supply of nutrient-rich compost for years to come.
0 comments:
Post a Comment